If you are getting error “WARNING: RESTRICT_SYSLOG is disabled. See SECURITY WARNING in Firewall Configuration” after clicking on “configServer security and firewall” then you have to follow below steps. You just need to change the value of RESTRICT_SYSLOG from 0 to 3 and save changes. This step will remove your error. In this article we are further going to explain the step by step method to remove this error. You can easily solve this problem through WHM or can directly access the csf.conf file and make changes in it. Both ways are explained below:
Login to WHM.
Click on “configServer security and firewall” under plugins or search “firewall” in search box.
A new window will appear with this error “WARNING: RESTRICT_SYSLOG is disabled. See SECURITY WARNING in Firewall Configuration”. To solve this error click on “Firewall Configuration”.
Here set RESTRICT_SYSLOG to 3.
At last SAVE and Restart CSF (ConfigServer Security & Firewall).
You can also directly make changes in csf configuration file through vi editor.
You can open the file though this command :
Code:
# vi /etc/cfs/csf.conf
In this file search for “RESTRICT_SYSLOG” and set it to 3.
The PHP Max Input Vars is the maximum number of variables your server can use for a single function. To work properly with a modern WordPress theme set this value to 5000. Lower values can create problems such lost data in your Theme Options, Widgets disappear etc.
How to increase the PHP Max Input Vars
Like the other values above, you’ll need to access and modify either the php.ini or the .htaccess files. Most hosts won’t grant you full access to modify the PHP.ini file because it affects the whole server and all the websites hosted on it.Please contact your host first to find out if they can adjust it for you.
For advanced users who have their own server setups and full access to the php.ini file, please go ahead and try Method 1 first before the other method. For standard users, we encourage you to try Method 2 instead.
1. Method: edit the PHP.ini file
NOTE: many shared hosts prohibit you from having direct access to the PHP.ini file. Only do this method if you have direct access to your PHP.ini file or if you’re on your localhost.
Locate your PHP.ini file. If you can’t find it, then you can create your own PHP.ini file in the root folder of your WordPress installation.
If you find your existing PHP.ini, open the file and locate the following line of code (xx represents a number):max_input_vars = xx; And set it to your desired limit. For example, 5000.
If you created your own PHP.ini file, then add the same code inside it:max_input_vars = 5000 Simply change the value to the recommended value. For example, 5000.
Save your changes, and reboot your localhost or your server.
2. Method: edit the .HTACCESS file
NOTE: make sure to backup your .htaccess file before editing.
Locate your .htaccess file which is usually in the root folder of your WordPress installation. If you can’t find it, it may be because it’s hidden. Here’s a tutorial for Windows and a tutorial for Mac on how to reveal hidden files on your computer.
Open the .htaccess file with a text editor program (Notepad or TextEdit) and add the following line of code:php_value max_input_vars 5000. Simply change the value to the recommended value. For example, 300.
Save the file and refresh your website.
Suhosin
This issue is less common, nowadays, but the issue can also occur due to a program called Suhosin which runs on your server. This is a known issue with WordPress and affects both the standard WordPress Menu System.
In most cases, the solution is as simple as asking your host to increase the max_vars variables in your php.ini.
Log files are the records that Linux stores for administrators to keep track and monitor important events about the server, kernel, services, and applications running on it. In this post, we’ll go over the top Linux log files server administrators should monitor.
What are Linux log files
Log files are a set of records that Linux maintains for the administrators to keep track of important events. They contain messages about the server, including the kernel, services and applications running on it.
Linux provides a centralized repository of log files that can be located under the /var/log directory.
The log files generated in a Linux environment can typically be classified into four different categories:
Application Logs
Event Logs
Service Logs
System Logs
Why monitor Linux log files
Log management is an integral part of any server administrator’s responsibility.
By monitoring Linux log files, you can gain detailed insight on server performance, security, error messages and underlying issues by. If you want to take a proactive vs. a reactive approach to server management, regular log file analysis is 100% required.
In short, log files allow you to anticipate upcoming issues before they actually occur.
How to read log files by SSH
cat /var/log/messages
Which Linux log files to monitor
Monitoring and analyzing all of them can be a challenging task.
The sheer volume of logs can sometimes make it frustrating just to drill down and find the right file that contains the desired information.
To make it a little easier for you, we will introduce you to some of the most critical Linux log files that you must be monitoring.
1. /var/log/messages
What’s logged here?:
This log file contains generic system activity logs.
It is mainly used to store informational and non-critical system messages.
In Debian-based systems, /var/log/syslog directory serves the same purpose.
How can I use these logs?:
Here you can track non-kernel boot errors, application-related service errors and the messages that are logged during system startup.
This is the first log file that the Linux administrators should check if something goes wrong.
For example, you are facing some issues with the sound card. To check if something went wrong during the system startup process, you can have a look at the messages stored in this log file.
2. /var/log/auth.log
What’s logged here?
All authentication related events in Debian and Ubuntu server are logged here.
If you’re looking for anything involving the user authorization mechanism, you can find it in this log file.
How can I use these logs?:
Suspect that there might have been a security breach in your server? Notice a suspicious javascript file where it shouldn’t be? If so, then find this log file asap!
Investigate failed login attempts
Investigate brute-force attacks and other vulnerabilities related to user authorization mechanism.
3. /var/log/secure
What’s logged here?
RedHat and CentOS based systems use this log file instead of /var/log/auth.log.
It is mainly used to track the usage of authorization systems.
It stores all security related messages including authentication failures.
It also tracks sudo logins, SSH logins and other errors logged by system security services daemon.
How can I use these logs?:
All user authentication events are logged here.
This log file can provide detailed insight about unauthorized or failed login attempts
Can be very useful to detect possible hacking attempts.
It also stores information about successful logins and tracks the activities of valid users.
4. /var/log/boot.log
What’s logged here?
The system initialization script, /etc/init.d/bootmisc.sh, sends all bootup messages to this log file
This is the repository of booting related information and messages logged during system startup process.
How can I use these logs?:
You should analyze this log file to investigate issues related to improper shutdown, unplanned reboots or booting failures.
Can also be useful to determine the duration of system downtime caused by an unexpected shutdown.
5. /var/log/dmesg
What’s logged here?
This log file contains Kernel ring buffer messages.
Information related to hardware devices and their drivers are logged here.
As the kernel detects physical hardware devices associated with the server during the booting process, it captures the device status, hardware errors and other generic messages.
How can I use these logs?:
This log file is useful for dedicated server customers mostly.
If a certain hardware is functioning improperly or not getting detected, then you can rely on this log file to troubleshoot the issue.
6. /var/log/kern.log
What’s logged here?
This is a very important log file as it contains information logged by the kernel.
How can I use these logs?:
Perfect for troubleshooting kernel related errors and warnings.
Kernel logs can be helpful to troubleshoot a custom-built kernel.
Can also come handy in debugging hardware and connectivity issues.
7. /var/log/faillog
What’s logged here?
This file contains information on failed login attempts.
How can I use these logs?:
It can be a useful log file to find out any attempted security breaches involving username/password hacking and brute-force attacks.
8. /var/log/cron
What’s logged here?
This log file records information on cron jobs.
How can I use these logs
Whenever a cron job runs, this log file records all relevant information including successful execution and error messages in case of failures.
If you’re having problems with your scheduled cron, you need to check out this log file.
9. /var/log/yum.log
What’s logged here?
It contains the information that is logged when a new package is installed using the yum command.
How can I use these logs?:
Track the installation of system components and software packages.
Check the messages logged here to see whether a package was correctly installed or not.
Helps you troubleshoot issues related to software installations.
Suppose your server is behaving unusually and you suspect a recently installed software package to be the root cause for this issue. In such cases, you can check this log file to find out the packages that were installed recently and identify the malfunctioning program.
10. /var/log/maillog or /var/log/mail.log
What’s logged here?
All mail server related logs are stored here.
How can I use these logs?
Find information about postfix, smtpd, MailScanner, SpamAssassain or any other email related services running on the mail server.
Track all the emails that were sent or received during a particular period
Investigate failed mail delivery issues.
Get information about possible spamming attempts blocked by the mail server.
Trace the origin of an incoming email by scrutinizing this log file.
11. var/log/httpd/
What’s logged here?
This directory contains the logs recorded by the Apache server.
Apache server logging information are stored in two different log files – error_log and access_log.
How can I use these logs?:
The error_log contains messages related to httpd errors such as memory issues and other system related errors.
This is the place where Apache server writes events and error records encountered while processing httpd requests.
If something goes wrong with the Apache webserver, check this log for diagnostic information.
Besides the error-log file, Apache also maintains a separate list of access_log.
All access requests received over HTTP are stored in the access_log file.
Helps you keep track of every page served and every file loaded by Apache.
Logs the IP address and user ID of all clients that make connection requests to the server.
Stores information about the status of the access requests, – whether a response was sent successfully or the request resulted in a failure.
12. /var/log/mysqld.log or /var/log/mysql.log
What’s logged here?
As the name suggests, this is the MySQL log file.
All debug, failure and success messages related to the [mysqld] and [mysqld_safe] daemon are logged to this file.
RedHat, CentOS and Fedora stores MySQL logs under /var/log/mysqld.log, while Debian and Ubuntu maintains the log in /var/log/mysql.log directory.
How can I use this log?
Use this log to identify problems while starting, running, or stopping mysqld.
Get information about client connections to the MySQL data directory
You can also setup ‘long_query_time’ parameter to log information about query locks and slow running queries.
Final Speech
While monitoring and analyzing all the log files generated by the system can be a difficult task, you can make use of a centralized log monitoring tool to simplify the process.
Some of our customers take advantage of using Nagios Log Server to manage their server logs. There are many opensource options available if that’s out of the budget. Needless to say though, monitoring Linux logs manually is hard.
So if you want to take a truly proactive approach to server management, investing in a centralized log collection and analysis platform which allows you to view log data in real-time and set up alerts to notify you when potential threats arise.
Spam is not just annoying, but often a security threat. Cleaning up cluttered mailboxes is time-consuming and messages are often laced with virus attachments or malicious links.
The best webmasters prevent spam, not just clean it up!
1. How to Prevent Spam in cPanel and Plesk
Use SpamAssassin + spam filter
Both cPanel and Plesk have SpamAssassin (SA) preinstalled and integrated into the local mail server. When enabled, SA scans all incoming email and rates them on various factors.
For example, does the email have images and no text?
If the rating exceeds the allowed score, the email is marked as spam or deleted (as based on your preferences).
Both panels also offer other filters, allow you to redirect or even delete emails based on keywords.
For example, the word “Viagra” in the subject line. These filters, in combination with SpamAssassin detections, create a very powerful anti-spam mechanism on the server.
How to enable SA in cPanel
Login to cPanel, go to the mail section.
Click the SpamAssassin icon and then enable it.
Note the options to auto-delete mail, or auto-add a prefix to suspect messages.
Using either the Global Mail Filters or the Mail Filters, add keyword-based filtering as needed.
How to enable SA in Plesk
Login to Plesk
Go to your domain
Go to the Mail tab
Go to the email address that you want to filter
Enable SpamAssassin (and as with cPanel, note the options to mark or delete)
2. Enable DKIM and SPF checks
DKIM is the second revision of the DomainKeys authentication system. It checks whether an email is from the domain it claims to have been sent from.
If the message fails this check, it gets rejected by the server as spam.
DKIM is two-way. Any email you send must be signed in order to not be discarded or bounced by another server. And then you can instruct your server to reject or black hole as well.
This process involves many steps, and a great guide for these panels can be found here. Plesk has a dedicated DKIM selection area, while cPanel leverages DKIM checking via custom SpamAssassin mail filtering rules.
3. Disable catchall email
The catch-all (or catchall), aka the domain default email account, will accept all messages to non-existent accounts on a server when enabled.
Spammers blast spam to sites, whether or not they know an address.
For example, sales@ is a common spam message sent to all sites. If sales@ does not exist, and a catchall does, it’s diverted to this mailbox. So never enable the catchall address!
Doing so wastes server space, can consume CPU and RAM, and can allow malware onto the system.
While it can be useful for senders who mistyped the email address, it’s not worth it. Either set the address to either blackhole (discard) or reject (bounce) the messages.
To enable in cPanel
Login to cPanel
Click the Default Address icon
Discard under the advanced options
Ignore the cPanel warning that it’s not recommended. It most certainly is recommended! Note that bouncing can create a backscatter problem, so blackholing is the best option.
To enable in Plesk
Login to Plesk
Go to your domain
Go to the Mail tab
Click on Mail for Non-Existent Users
Make sure “reject” is enabled by default. (Unfortunately, Plesk does not give the option to blackhole, so reject is next best)
Linux VPS servers have their advantages. In fact, Linux VPS are much more secure when compared to other operating systems like Windows because of Linux’s security model (LSM). But they’re not perfect, and definitely not invulnerable. In this post we’ll go over 20 ways you can secure your VPS and protect it from hackers.
Linux’s default security is pretty good, and better than that of most of its competitors, but it still has weaknesses.
These techniques don’t need to take a huge amount of time and effort, but a certain level of administrative experience is required.
If you need any help then don’t be afraid to get in touch – we’ll be happy to help.
Let’s get started, here are 20 ways to keep your VPS secure.
1. Disable root logins
Want a secure VPS? Then you should never log in as the root user.
By default, every Linux VPS has “root” as a username, and so hackers try brute force attacks to crack the password and gain access. Disabling logins from the “root” username adds another layer of security, as it stops hackers from simply guessing your user credentials.
Instead of logging in as the root user, you’ll need to create another username and use the “sudo” command to execute root level commands.
Sudo is a special access right that can be given to authorized users so that they can run administrative commands, and it eliminates the need for root access.
Be sure to create your non-root user and to give it the appropriate levels of authorization before you disable the “root” account.
When you’re ready, go ahead by opening up /etc/ssh/sshd_config in nano or vi and finding the “PermitRootLogin” parameter.
By default, this will say “yes”.
Change it to “no” and save the changes.
2. Change the SSH port
It’s hard for people to hack SSH when they can’t find it. Changing the SSH port number can prevent malicious scripts from directly connecting to the default port (22).
To do this, you’ll need to open up /etc/ssh/sshd_config and to change the appropriate setting.
Be sure to double check whether the chosen port number is being used by any other services – you don’t want to create a clash!
3. Keep server software updated
It isn’t difficult to update your server’s software.
You can simply use the rpm/yum package manager (CentOS/RHEL) or apt-get (Ubuntu/ Debian) to upgrade to newer versions of installed software, modules, and components.
You can even configure the operating system to send yum package update notifications via email. This makes it easy to keep track of what’s changing. And, if you’re happy to automate the task, you can set up a cronjob to apply all available security updates on your behalf.
If you’re using a panel, such as Plesk or cPanel, then you’ll need to update that, too. Most panels can be set to update themselves automatically, and cPanel uses EasyApache for most package updates.
Finally, you’ll want to apply security patches as quickly as possible. The longer you wait, the more likely you are to succumb to a malicious attack.
4. Disable unused network ports
Open network ports and unused network services are easy targets for hackers, and you’ll want to protect yourself against exploitation.
Use the “netstat” command to see all currently open network ports and their associated services.
Consider setting up “iptables” to close all open ports or using the “chkconfig” command to disable unwanted services. And if you use a firewall like CSF, you can even automate the iptables rules.
5. Remove unwanted modules/packages
It’s unlikely that you’ll need all of the packages and services that came bundled with your Linux distribution. Every service that you remove is one less weakness to worry about, so make sure that you’re only running services that you’re actually using.
On top of that, avoid installing unnecessary software, packages, and services to minimize potential threats. It has the welcome side-effect of streamlining your server’s performance, too!
6. Disable IPv6
IPv6 has several advantages over IPv4, but it’s unlikely that you’re using it – few people are.
Not using IPv6? Disable it!
But it is used by hackers, who often send malicious traffic via IPv6, and leaving the protocol open can expose you to potential exploits. To combat the problem, edit /etc/sysconfig/ network and update the settings so that they read NETWORKING_ IPV6=no and IPV6INIT=no.
7. Use GnuPG encryption
Hackers often target data while it’s in transit over a network. That’s why it’s vital to encrypt transmissions to your server using passwords, keys and certificates. One popular tool is GnuPG, a key-based authentication system that’s used to encrypt communications. It uses a “public key” that can only be decrypted by a “private key” that’s available only to the intended recipient.
8. Have a strong password policy
Weak passwords always have been – and always will be – one of the largest threats to security. Don’t allow user accounts to have empty password fields, or to use simple passwords like “123456”, “password”, “qwerty123” or “trustno1”.
You can boost security by requiring all passwords to mix lower and upper case, to avoid the use of dictionary words and to include numbers and symbols. Enable password aging to force users to change old passwords at regular intervals, and consider restricting the re-use of previous passwords.
Also use the “faillog” command to set a login failure limit and to lock user accounts after repeated failed attempts to protect your system from brute force attacks.
9. Configure a firewall
Simply put, you need a firewall if you want a truly secure VPS.
Luckily, there are plenty to choose from. NetFilter is a firewall that comes integrated with the Linux kernel, and you can configure it to filter out unwanted traffic. With the help of NetFilter and iptables, you can fight against distributed denial of service (DDos) attacks.
TCPWrapper is another useful application, a host-based access control list (ACL) system that’s used to filter network access for different programs. It offers host name verification, standardized logging and spoofing protection, all of which can help to beef up your security.
Other popular firewalls include CSF and APF, both of which offer plugins for popular panels like cPanel and Plesk.
10. Use disk partitioning
For added security, it’s a good idea to partition your disk to keep operating system files away from user files, tmp files and third-party programs. You can also disable SUID/SGID access (nosuid) and disable the execution of binaries (noexec) on the operating system partition.
11. Make /boot read-only
On Linux servers, all kernel-specific files are stored inside the “/boot” directory.
But the default access level for the directory is “read-write”. To prevent unauthorized modification of the boot files – which are critical to the smooth running of your server – then it’s a good idea to change the access level to “read only”.
To do this, simply edit the /etc/fstab file and add LABEL=/boot /boot ext2 defaults, ro 1 2 to the bottom. And, if you need to make changes to the kernel in the future, you can simply revert back to “read-write” mode. Then you can make your changes and set it back to “read only” when you’ve finished.
12. Use SFTP, not FTP
File transfer protocol (FTP) is outdated and no longer safe, even when using “FTP over TLS” (FTPS) encrypted connections.
Both FTP and FTPS are still vulnerable to packet sniffing, when a computer program intercepts and logs the traffic that’s passing over your network. FTP is fully “in the clear” and FTPS file transfers are also “in the clear”, which means that only the credentials are encrypted.
SFTP is “FTP over SSH” (also known as “secure FTP”), and it fully encrypts all data – including both the credentials and the files that are being transferred.
13. Use a firewall
Your firewall is the gatekeeper that either allows or denies access to the server, and it’s your first line of defense against hackers.
Installing and configuring a firewall should be one of the first things that you do when setting up and securing a VPS or bare metal server.
A firewall’s main job is to deny access to any sources of known malicious traffic, and it effectively acts as your first line of defense. But no firewall is fool-proof and harmful software can still slip through, which is why you need to protect yourself further.
Too many novice server admins fail to install anti-malware software, and that’s a mistake. The most common reason for this isn’t laziness – it’s actually because they don’t want to spend money on security software.
As a rule, the paid solutions are usually the best, because their revenue stream allows them to hire talented programmers and researchers who can help the software to stay relevant.
But if budget is an option then it’s a good idea to look at some of the free alternatives.
ClamAV and Maldet are two open-source applications that can scan your server and score potential threats. That’s why we install both of them as part of the VPS security hardening process for our managed hosting customers.
Hackers are constantly trying to locate security loopholes – especially in your website’s content management system (CMS). Popular CMS providers include Joomla, Drupal and WordPress, which powers nearly 20% of the web.
Most CMS developers regularly release security fixes, as well as new features.
Much more allow you to automatically update the CMS so that the fix is applied as soon as a new version is released. WordPress was late to the game with auto-updates, and if you’re running an older site then it might be disabled by default. Be sure to check the setting and to enable auto-updates where possible.
Remember that your website’s content is your responsibility, and not your host’s. It falls to you to ensure that it’s regularly updated, and it’s a good idea to take regular backups, too.
16. Enable cPHulk in WHM
As well as offering a firewall, cPanel also has “cPHulk” brute force protection.
Firewalls aren’t infallible, and “good” traffic that slips through can turn out to be bad. These false positives are due to the firewall’s settings, and tweaks might be needed to offer additional protection.
In the meantime, cPHulk acts like a secondary firewall, preventing brute-force attacks (from repeated attempts to guess the password) on the server.
We often find that cPHulk blocks the login ability first and that the firewall later catches up, banning the entire IP. To enable it, you’ll need to go to the WHM Security Center and select cPHulk Brute Force Protection. This is another step in the security hardening process that we use on our managed VPS and dedicated servers.
17. Prevent anonymous FTP uploads
cPanel and Plesk both disable anonymous FTP uploads by default but other setups can come with it pre-enabled.
Allowing anonymous users to upload via FTP is a massive security risk, because it allows anyone to upload anything they want to your web server. As you can imagine, it’s not recommended – it’s a bit like giving your keys to a burglar.
To disable anonymous uploads, edit your server’s FTP configuration settings.
18. Install a rootkit scanner
One of the most dangerous pieces of malware is the rootkit.
It exists at the operating system (OS) level, below other normal security software, and it can allow undetected access to a server. Luckily, you can use “chrootkit”, an open-source tool, to find out whether your server is infected. But rootkits aren’t always easy to remove, and the best way to fix the issue is often to reinstall the OS.
19. Take regular backups
Too many people forget to take regular backups – and then they regret it when something goes wrong and they don’t have a copy of their data. No matter how careful you are, and no matter how secure your server is, there’s always a chance that something could go wrong.
Don’t take unnecessary risks by failing to take backups, and don’t rely on your host to do it either. Taking backups of your own is recommended, even if your hosting provider says that they do it on your behalf. Store copies of it in different locations and consider using the cloud so that your backup can be accessed from anywhere.
20. Use a strong password
We know, we know – we’ve already said this.
But a strong password policy is absolutely vital, and so it’s always worth repeating. Poor passwords are still the number one threat to security. And the same applies for when securing windows servers as well!
Password protocol is often misunderstood. Complexity is important, but so is length. While it’s a good idea to use a mixture of capital and lower case letters, numbers and special characters, you should also make it as long as is realistically possible.
Linux Malware Detect (LMD) or simply Maldet is a free malware scanner designed for Linux machines released under the GNU GPLv2. It is specially designed around the threats in the shared hosted environment. LMD uses threat data from network edge intrusion detection systems to get the actual malware that is used in attacks and generates a variety of signatures for detection.
In addition to these features, LMD threat data can also be extracted from user submissions with the checkout feature in LMD from malware resources. It uses signatures such as HEX pattern and MD5 file hashes. They can also be extracted from a variety of detection tools including ClamAV.
Before we start the installation process, this tutorial assumes that you have some basic knowledge of SSH. These instructions apply to users who deal with VPS (Virtual Private Servers) or Dedicated servers.
Let’s get started.
Step 1: Updating the Packages
First, make sure the packages are up-to-date. To do so, run the command below:
$ yum -y update
Step 2: Installing Linux Malware Detect
Go to the official Linux Malware Detect page and download the software to your server:
You can change the current directory with the command below:
$ cd maldetect-*
Now run the file to install the script:
sh install.sh
Once the installation process is complete, you should have the output below:
 Created symlink from /etc/systemd/system/multi-user.target.wants/maldet.service to /usr/lib/systemd/system/maldet.service.
 Linux Malware Detect v1.6
 (C) 2002-2017, R-fx Networks  (C) 2017, Ryan MacDonald
 This program may be freely redistributed under the terms of the GNU GPL
 installation completed to /usr/local/maldetect
 config file: /usr/local/maldetect/conf.maldet
 exec file: /usr/local/maldetect/maldet
 exec link: /usr/local/sbin/maldet
 exec link: /usr/local/sbin/lmd
 cron.daily: /etc/cron.daily/maldet
 maldet(1344): {sigup} performing signature update check...
 maldet(1344): {sigup} local signature set is version 2017070716978
 maldet(1344): {sigup} new signature set (2017080720059) available
 maldet(1344): {sigup} downloading https://cdn.rfxn.com/downloads/maldet-sigpack.tgz
 maldet(1344): {sigup} downloading https://cdn.rfxn.com/downloads/maldet-cleanv2.tgz
 maldet(1344): {sigup} verified md5sum of maldet-sigpack.tgz
 maldet(1344): {sigup} unpacked and installed maldet-sigpack.tgz
 maldet(1344): {sigup} verified md5sum of maldet-clean.tgz
 maldet(1344): {sigup} unpacked and installed maldet-clean.tgz
 maldet(1344): {sigup} signature set update completed
 maldet(1344): {sigup} 15215 signatures (12485 MD5 | 1951 HEX | 779 YARA | 0 USER)
Step 3: Configuring LMD
Linux Malware Detect configuration file is /usr/local/maldetect/conf.maldet and it can be modified as per the requirements below:
$ vi /usr/local/maldetect/conf.maldet
The default file in your system should look like this:
 # Enable Email Alerting
 email_alert="1"
 # Email Address in which you want to receive scan reports
 email_addr="[email protected]"
 # Use with ClamAV
 scan_clamscan="1"
 # Enable scanning for root owned files. Set 1 to disable.
 scan_ignore_root="0"
 # Move threats to quarantine
 quarantine_hits="1"
 # Clean string based malware injections
 quarantine_clean="1"
 # Suspend user if malware found.
 quarantine_suspend_user="1"
 # Minimum userid value that be suspended
 quarantine_suspend_user_minuid="500"
Now change the settings below:
email_alert=1 – If you want to receive email alerts
email_addr=”[email protected]” – Type the address where you want to receive the malware email alerts
quar_hits=1 – The default quarantine alert for malware hits
quar_clean=1 – Clears the detected malware injections
Step 4: Set CronJob for Auto Scanning
In the installation process, a cron job file is installed in /etc/cron.daily/maldet.
These files installed by LMD are useful in keeping the current session, performing daily updates of the signature files, temp, as well as store quarantine data for not more than two weeks or 14 days. It runs a daily scan of all recent files on the system.
To ensure these files are compatible with the structure of your server and those in the Cron file, check the control panel and make the necessary changes.
 #!/bin/bash
 # clear quarantine/session/tmp data every 14 days
 /usr/sbin/tmpwatch 336 /usr/local/maldetect/tmp >> /dev/null 2>&1
 /usr/sbin/tmpwatch 336 /usr/local/maldetect/sess >> /dev/null 2>&1
 /usr/sbin/tmpwatch 336 /usr/local/maldetect/quarantine >> /dev/null 2>&1
 /usr/sbin/tmpwatch 336 /usr/local/maldetect/pub/*/ >> /dev/null 2>&1
 # check for new release version
 /usr/local/maldetect/maldet -d >> /dev/null 2>&1
 # check for new definition set
 /usr/local/maldetect/maldet -u >> /dev/null 2>&1
 # if were running inotify monitoring, send daily hit summary
 if [ "$(ps -A --user root -o "comm" | grep inotifywait)" ]; then
 /usr/local/maldetect/maldet --alert-daily >> /dev/null 2>&1
 else
 # scan the last 2 days of file changes
 if [ -d "/home/virtual" ] && [ -d "/usr/lib/opcenter" ]; then
 # ensim
 /usr/local/maldetect/maldet -b -r /home/virtual/?/fst/var/www/html 2 >> /dev/null 2>&1
 /usr/local/maldetect/maldet -b -r /home/virtual/?/fst/home/?/public_html 2 >> /dev/null 2>&1
 elif [ -d "/etc/psa" ] && [ -d "/var/lib/psa" ]; then
 # psa
 /usr/local/maldetect/maldet -b -r /var/www/vhosts/?/httpdocs 2 >> /dev/null 2>&1
 /usr/local/maldetect/maldet -b -r /var/www/vhosts/?/subdomains/?/httpdocs 2 >> /dev/null 2>&1
 elif [ -d "/usr/local/directadmin" ]; then
 # DirectAdmin
 /usr/local/maldetect/maldet -b -r /var/www/html/?/ 2 >> /dev/null 2>&1
 /usr/local/maldetect/maldet -b -r /home?/?/domains/?/public_html 2 >> /dev/null 2>&1
 else
 # cpanel, interworx and other standard home/user/public_html setups
 /usr/local/maldetect/maldet -b -r /home?/?/public_html 2 >> /dev/null 2>&1
 fi
 fi
To active the email alerts once a malware is detected, open the Maldet configuration file that is found in /usr/local/maldetect/conf.maldet and type the following:
email_alert=1 email_subj=”Maldet alert from $(hostname)” email_addr=”[email protected]
Step 5: Manual Scanning
To scan a directory you want to use, run the command below:
$ maldet -a /path/to/directory
To ensure Maldet is up-to-date, run the command below:
$ maldet -u
You can see the details of the options available by running the following command:
$ maldet - h
Now Linux Malware Detect (LMD) is successfully installed.
Then to be sure, do the following to install openssl. Nothing will happen naturally if openssl is already installed.
sudo apt-get install openssl
Then install the required ssl mods for your apache instance and activate them:
sudo a2enmod ssl
Generate the CSR
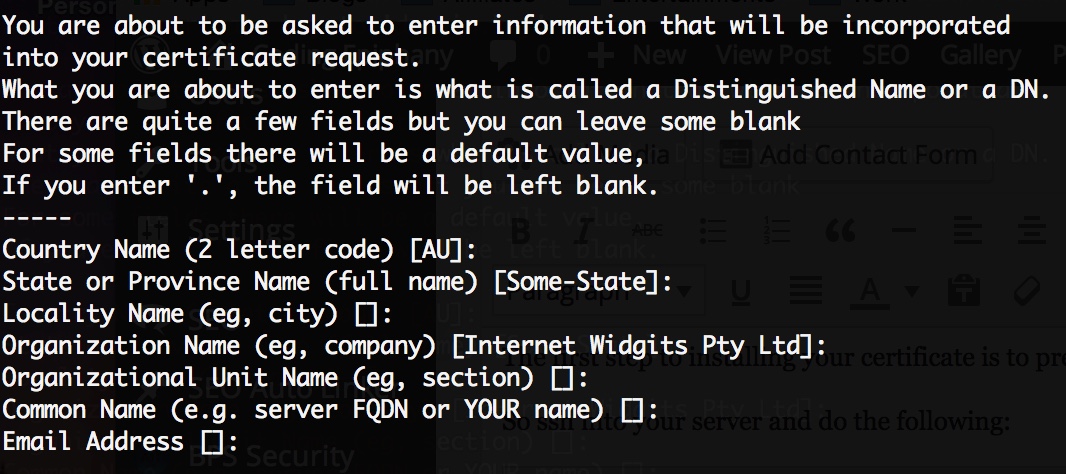
In order for GoDaddy to be able to issue our SSL certificate, we need to generate the CSR (Certificate Signing Request) key and our Private Key. In your home directory, do the following. You don’t need to do sudo at this point.
After running the above command you will be required to answer some identity questions. Make sure you answer them as accurate as possible. The questions will look like something below:
You don’t really need to use the challenge password with GoDaddy at the time of this writing.
Now that you have completed generating the private key and the CSR, it’s time to send it through to GoDaddy.
Generate the Secure Certificate
Open the website_ssl.csr that we generated before. You can use vim or you can simply cat it to the terminal. The CSR should look like this:
So copy the entire content from your CSR file, including the —–BEGIN and END.
Then login to GoDaddy, locate your secure certificate product and click launch. After that, click on setup and choose provide CSR. Then paste the content of the CSR file that you just copied previously.
When done, just wait until GoDaddy verifies your website’s identity and grant you access to download the certificate, in my case this happens very quick, at most within 10 minutes.
Installing the Certificate in Your Server
Once GoDaddy email you that your certificate has been generated, follow the link and download the certificate to you computer for now. Basically it’s a zip file containing 2 files, the one that looks like a randomly generated hash is your secure certificate (let’s call it 6eba0aa5c1b8.crt for this article), while the one that starts with gd_bundle_ is your certificate chain file.
So upload both files to your home directory in your Ubuntu server instance. You should now have the website_ssl.key, 6eba0aa5c1b8.crt, gd_bundle-g2-g1.crt. Then move those 3 files to the ssl directory that you created previously.